How do I... ?
Find answers to other questions in Tech Community.
Also, check out our Troubleshooting made easy page.
Get started with Luma
We make things incredibly easy for you with this step-by-step guide! Please read it before calling Technical Support.
Go to the Function Panel > AI/Event > Event Notification > Push Message page.
Set the schedule using the Schedule Management button. Click Test, then Apply.
Note: Schedules you create can be used for recording, AI analytics, push notifications, and alarm settings.
Pro Tip: For best results, set up email notifications at the NVR and not at the camera.
Go to the Function Panel > AI/Event > Event Notification > E-mail page.
Here you create the list of people who receive email alerts from alarms. To add a person, enter their email, select the schedule during which they'll receive notifications, and click Add.
You can edit the schedule for a recipient in the table, or delete them outright.
At the bottom, you can click the eye toggle to hide or reveal the sender's email address.
Schedule Management: This opens the Schedule dialog. Three schedules are preset for the system. The first is the default 24×7 schedule. This cannot be edited or deleted.
The other two default to weekdays (24×5) and weekends (24×2), but can be edited and renamed to fit install needs. Click Add above the schedule list to add a new schedule.
Click Edit to open the Edit Schedule dialog. Rename the schedule at the top. Click Erase or Add to modify the schedule bars. Click and drag in a schedule bar to add or erase times.
Click Edit Sender to go to the Function Panel > Network > Network > Email page.
Here you configure the emails that the camera sends with alerts.
Sender Name: This is who the email appears to be from.
Email Address: If someone replies to this message it’ll go here.
Next, fill in the Server Address and SMTP Port, and select the security mode as required by your email provider.
Attaching Image can cause the NVR to add a snapshot (or several) of the event to the email.
Finally, enter the credentials for the email server, or click Anonymous Login.
Click Test to verify all settings (the NVR asks you to enter the password to your email server), and Apply when it works.
Activate email notifications on each camera you want the notifications to come from.
For general motion alerts, go to the Function Panel > AI/Event> General Event > Motion page.
For intrusion or line crossing, go to the Function Panel > AI/Event> AI Event > People Vehicle Detection page and choose the event to send notifications.
Click the Trigger Mode tab. Select E-Mail for each desired camera. Click Apply before exiting.
Integrate x20 devices with older models
Pro Tip: When installed together, x10 and x20 devices are not plug-and-play without prior configuration. You will need a laptop and PoE switch to do this onsite. See below for details.
If you are attaching an x10 camera to a port on the x20 NVR, follow these steps.
-
Activate the x10 IP camera by creating an admin password. (If moving an activated camera from an x10 NVR, the camera already uses the NVR's password.)
-
In the camera's settings menu, enable ONVIF for the camera using the IPC's admin password.
-
In the camera's network settings, ensure that it is set to DHCP. Do not reboot! When prompted, click Cancel. Disconnect the camera.
-
Connect the x10 IP camera to the x20 NVR.
-
The camera connects after 2-3 minutes. You may view this status using OvrC, or on the web UI of the NVR under Settings > Manage Camera.
-
If the x10 camera remains offline, go to the NVR's Function Panel > Camera > Edit. Check the box next to Modify Password and enter the ONVIF password.
The NVR automatically selects x10 protocol.
If you are adding an x10 on a separate PoE switch, or adding a camera with local power over the network, just ensure that ONVIF is enabled on the NVR. There are no additional steps.
x20 IP Cameras are not plug-and-play with x10 NVRs when connected to the NVR's PoE. You must prepare the x20 IP camera before plugging it into the PoE switch of an x10 NVR.
The fastest way to connect an x20 IP camera to an x10 NVR is to use a separate PoE switch or PoE injector temporarily (see below). This helps you to complete the preparation efficiently.
-
Connect the x20 IPC to the LAN and verify it is accessible using OvrC. OvrC makes this process much easier.
-
Once the camera has been added to OvrC, ensure that it and the NVR are on the latest firmware.
-
Navigate to the x20 IPC in the OvrC device list, click the Configure tab, and click Camera Credentials.
-
Click the back button in OvrC. Navigate to IP Settings.
-
Set DHCP to Static. Set the camera's IP Settings to match the IP scheme of the x10 NVR.
-
Unplug the x20 IPC from the PoE switch and plug it into the x10 NVR. Note the port that you plugged the IPC into.
-
Navigate to the Settings page of the x10 NVR. Select Camera Management.
-
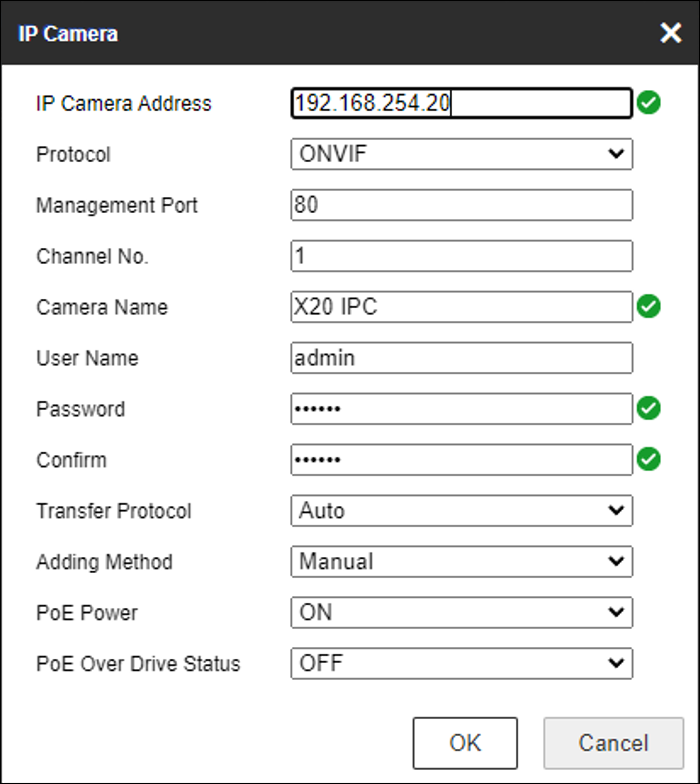
Select the channel that you plugged the x20 IPC into. Click Modify.
-
Ensure the camera's protocol is set to ONVIF.
-
Click OK, then wait at least 60 seconds for the camera to come online in the x10 NVR.
-
Connect the x20 IPC to the LAN and verify it is accessible using OvrC. OvrC makes this process much easier.
-
Once the camera has been added to OvrC, ensure that it and the NVR are on the latest firmware.
-
Navigate to the x20 IPC in the OvrC device list, click the Configure tab, and click Camera Credentials.
-
Navigate to the Settings page of the x10 NVR. Select Camera Management.
-
Select the channel that you plugged the x20 IPC into. Select Modify.
-
Ensure the camera's protocol is set to ONVIF.
-
Click OK, then wait at least 60 seconds for the camera to come online in the x10 NVR.
Wirepath, Visualint, and other brands are not officially supported. If using ONVIF does not work, Streaming APIs (RTSP/HTTP commands) generally works.
Ensure that the RTSP string used for the substream is not at a resolution of 1080p or higher. Substreams are intended for a quick view, not a detailed view. The x20 NVRs' live view grid does not support resolutions 1080p or higher; if the a resolution is too high, the NVR displays a black rectangle.
Operate software and firmware
Before saving a file to the PC, you must configure the path to the PC in the VMS.
Navigate to Configuration > Local Configuration > Record and Snapshot Setting tab to set the backup path.
To export a specific archive in its entirety, navigate to Record and Playback > Backup on PC and search for the file you want to download.
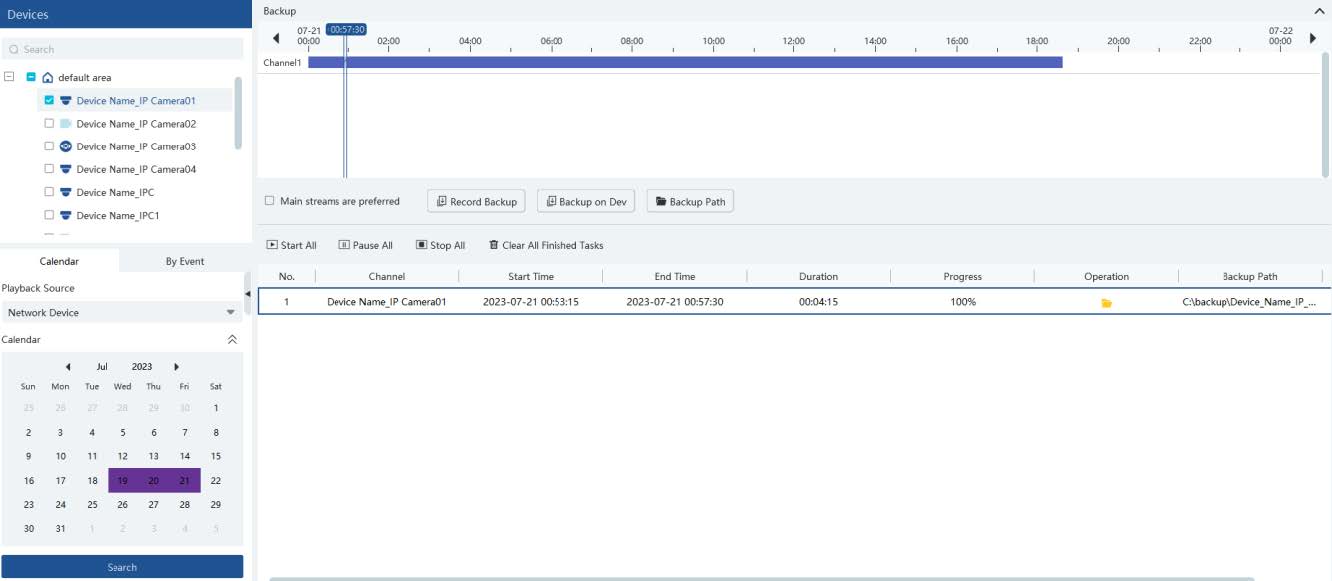
At the top, select the device(s) that you wish included in the search. The Search bar at the top can help you find devices quickly.
The bottom has two tabs: Calendar and By Event.
-
In the Calendar tab, click a date to see all recordings for the selected channels for that day.
-
In the By Event tab, manually enter the start and finish dates and times. Additionally, select which types of recordings you want shown.
Click Search, and all files that meet those criteria display in the large pane.
Click Backup on PC to save the file to the location you designated in the Local Configuration interface.
To export a section of a video file, locate the file as shown above.
When you click on the file in the timeline, playback and editing controls appear.
-
Rewind 30 seconds
-
Advance 30 seconds
-
Edit the start and end time of a file (see below)
-
Download the file to an external device
-
Asynchronous playback
To download a section of a video file to your computer, click the scissors icon to enter editing status, then click on the recording in the timeline to select the start and end time. Finally, click the download icon to save the file.
When you update firmware in OvrC, the firmware version does not immediately change, This appears to be a problem, but it actually isn't.
Luma x20 and x21 devices run in a dual-firmware mode to protect the hardware (and your installs) from unforeseen glitches.
Once the firmware has been applied to the first (operational) partition, the device goes into an observation mode to ensure the new firmware operates properly. Observation mode lasts for about ten minutes once the firmware update is completed.
Once proper function has been verified, the device applies the firmware to the second (backup) partition and logs the new firmware version with OvrC. If the new firmware fails, the device restores the backup firmware to the first (operational) partition.
As of this writing, OvrC does not track whether a Luma x20 device is in observation mode. This means that, for about ten minutes in OvrC, it looks like the firmware update didn’t take, and that an update is available. If you try to update the firmware again while your Luma is in observation mode, the update will fail in OvrC but this will not impact the performance of the device.
While in observation mode, you can log in to the device’s web UI to see the proper firmware version.
These links take you to Tech Community articles.
Connecting x10 cameras to an x20 NVR including Control4 integration.
Connecting x20 cameras to an x10 NVR including Control4 integration.
Before you begin, please read the Software requirements to ensure your system has the power needed to handle VMS to your expectations.
To download the VMS,
-
Using Firefox or Safari, download the VMS zip file here. Using Chrome or Edge, copy this link into a new tab: http://snp1.co/luma-vms-dl . Chrome may say "Insecure download blocked" but if you press Keep it will download just fine.
-
Unzip the VMS download.
-
Double click Luma View VMS Lite.exe and follow the prompts. You may need to close antivirus software.
-
To uninstall, click Start > Luma View VMS > Uninstall.
The procedure, along with download links, etc., can be found Launch the software for the first time.
Set up special features
Do this using OvrC (immediately below) or scroll down to the web UI instructions.
Using OvrC
In OvrC, click on the camera's name to go to its Device Details page. Select whether you want smart tracking to be activated by area intrusion or line crossing.
-
Enable that function.
-
Click on the edit icon for that function.
-
Use the PTZ control rosette to move the camera into its home position, where it can see the line or area well.
-
Set this as the PTZ's home position by enabling Smart Tracking Home Position.
-
Draw the line or zone. Enable the targets and adjust the sensitivity as usual.
-
Switch PTZ Smart Tracking on.
-
Click the back arrow to return to the Device Details page.
-
Ensure the Intrusion Zone or Line Crossing is still enabled.
Using the web interface
Connect to the camera. Navigate to Config > Event. Decide whether you want smart tracking to be activated by region intrusion or line crossing; click that link.
-
Enable that function.
-
Click Save.
-
Go to the Area tab
-
Use the PTZ control rosette to move the camera into its home position, where it can see the line or area well.
-
Set this as the PTZ's home position by enabling Save smart tracking home position.
-
Draw the line or zone.
-
Click Save.
-
Go back to the Detection Config tab.
-
Enable the targets and adjust the sensitivity as usual.
-
Near the bottom, enable Trigger PTZ Smart Tracking.
-
Click Save.
The 820 hybrids and the 420 mini PTZ have a built-in light, speaker, and microphone for active deterrence. Active deterrence has two portions: light and audio. You can trigger active deterrence like any other alarm, but we recommend you use AI analysis rather than standard motion detection.
In the web UI, navigate to Config > Event > Region Intrusion or Config > Event > Line Crossing.
Go to the Area/Line tab. Select the area or line you want to use to activate active deterrence.
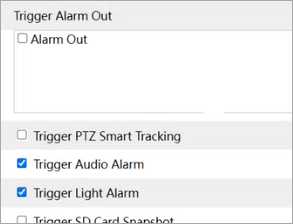
Go to the Detection Config tab. In the Trigger Alarm Out section, enable Trigger Audio Alarm and/or Trigger Light Alarm.
Click Save.
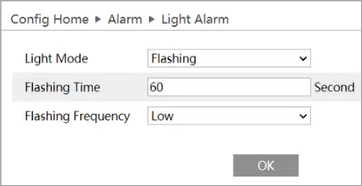
If you enabled the light, navigate to Config > Alarm > Light Alarm. Here you set the duration (1–60 seconds) and strobe speed of the light.
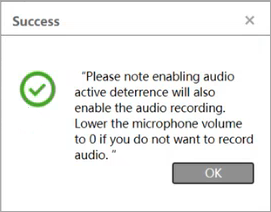
If you enabled audio, you get a warning dialog reminding you to check the local laws with regard to audio recording. Click OK.
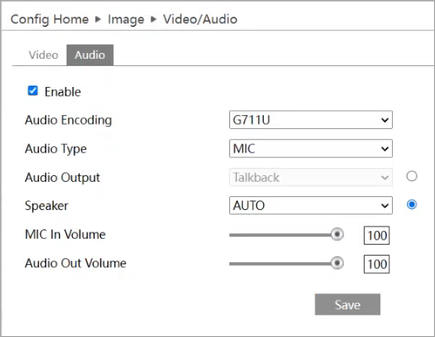
Ensure that the audio is enabled. Adjust the microphone and speaker volumes as necessary. Under Audio Output, enable talkback if two-way communication is desired.
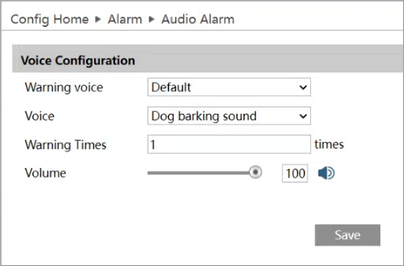
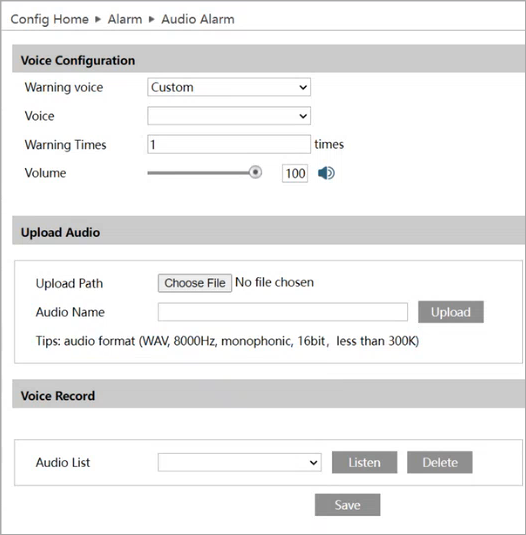
If you want to play an audio alarm instead, navigate to Config > Alarm > Audio Alarm and configure the settings there.

